Saturday, May 12, 2012

Experiments With Putty


   I bought a can of Durham's "Rock Hard" Water Putty because I need something to cast my street with, but also because I like the design of the can (reminds me of the "Pep Boys.") I have used plaster of paris in the past, but wanted to try something different. So I am currently experimenting with Durham's, and initial tests are quite promising.

     The greatest asset of Durham's is its natural color. It dries to a perfect California desert yellow. The info on the can says that it won't take a stain after it dries, but that's not an issue for me. The desert color is exactly what I want for a base color. The setting time seems about average, firming up in an hour or so, and drying out completely by the next day. The hardness is good also, being soft enough to carve, yet very durable. I'm quite excited about the possibilities!

Flexible enough to crack without breaking.
     My first test was to mix up a stiff batch and spread it into a form made of 1/8" balsa strips pinned to a plywood slab. I smoothed it out as best I could, but the surface was still a little irregular (this turned out to be a plus, as it dries resembling a flat rock surface.) After it set up, I took away the forms and popped it off the plywood. Overnight it acquired a slight curve, since one side dried faster than the other. I pressed it flat, and it cracked from a corner to the center without breaking in half. Another good sign, and the crack looks quite natural. I scribed a few grooves in the face, and carved out a few bricks. As far as I'm concerned, the effect is absolutely amazing.

Wet carved bricks are at the top, dry carved below.
     I carved a few bricks while it was still damp, and several more when it was dry. The difference is slight, but noticeable. The softer you carve, the rounder your brick corners will be. Personally, I think the best thing is to carve while dry. You have better control. I'm using a bookbinder's bodkin, which has a sharp but substantial point. Scribe the courses with a ruler, then  cut the courses into individual bricks by hand. Then scribe around each brick to round off the corners and break up the regularity. 

     So for the initial test, I'm absolutely thrilled.  I have now poured an identical slab of much wetter mixture, and a thicker slab of wetter still. Stay tuned for further experiments.

Engines

     Eventually, I'm going to need an engine for my railroad, but for now I have time to consider my options. For a steamer, smallish six-coupled drivers will be needed to negotiate #4 turnouts and still have tractive power to make the grades. SP's saddle tank yard goat is a hum-dinger of an engine that checks all the boxes for me, in addition to being funny looking, which is an added bonus. I've always been fascinated by utilitarian industrial designs, and this is a perfect example of that genre.

Electra in San Francisco, 1906
     But I'll undoubtably want an electric as well, just so I can have the fun of stringing live overhead. The Electra was built in 1902 for the North Shore R.R. in Marin County, but I remember her as the little red steeplecab that my brother and I played on as children. Since before I was born, she has lived at Travel Town in Griffith Park, Los Angeles. A great part of her life was spent as Pacific Electric 1544, and she worked the Torrance Shops. Today I live in San Francisco, Electra lived in Marin; I one lived in Hawthorne, Electra lived in Torrance. Seems she's always been in a town adjacent to mine.
     I could build her just as the original was made. A recycled cab unit, with two chopped-off tender tanks welded on, formed the superstructure. A couple of power trucks, and she's ready to run. Oh, of course I'll need to add a pantograph, instead of the trolley pole. For yard and switchback operation, it's a must.

     But I'll need a diesel just to round things out, and a boxcab is just the ticket. This one I could really have fun scratchbuilding, with all the rails, grab irons, chains, and bells. I could even model the cowboy too!

Wednesday, May 9, 2012

Benchwork

     Here is a glimpse of the layout so far, perched atop my desk at work. For the record my desktop is 10' x 4', though it looks smaller in the picture. Oh, if only I could build on the entire 40 square feet!


     The shelf is 8' long and 1' wide, made of 5/8" plywood with baseboard trim stiffening it front and back. Slabs of 2x4 close the ends. The backdrop is masonite, which I plan to paint by hand. It rests on recycled fish crates, which I have stained in festive colors, and sits at a very good height.

     The near end will be Drywater, the far end Topdown. Blowtop Mountain will rise in the center, pierced by three switchback tunnels and any number of delirium mine shafts. Starting from Drywater yard, where my beloved Santa Fe Hi Cube stands duty as a height gauge, the first grade leads up to lower Topdown. Switching back, the train will go through Blowtop and roll into Drywater's main street. Tracks will be in pavement, possibly cobblestones if I get ambitious. The final switchback will lead on up to the Topdown delirium mine, known as the "Delirium Terminus." I owe my delirium mines to John Allen and his "lugubrium plant."

     Uncle Cosmo left me a specimen of Topdown delirium. It is sparkly, heavy, halfway between gold and silver in color, and looks suspiciously like iron pyrite.

     Oh, and the bins you see on the end are work related, and have nothing to do with waybills or car cards. It's how I justify all this to my boss; my railroad is just there to hold up the document trays!

Sunday, May 6, 2012

The Long and Short

     While 8' seems like miles to my N scale sensibilities, it's not very long for an HO switchback layout. My trains will be limited to a tank engine, one or two cars, and a caboose. Although, since the T&D never willfully discarded any of its outdated rolling stock, I can model 36' boxcars, a bobber caboose, and even Civil War era 28' cars without sacrificing accuracy. My next car will be a 24' wood gondola, the spirit wagon which Uncle Cosmo mentions in his journal.
     "At various times residents of the Topdown terminus, in a haze of intoxication on the products of their distilling apparatus, would clamber aboard the spirit wagon, being built up out of lumber salvaged from the delirium mine shafts, and set it to rolling down the grade and into Drywater. These episodes would rouse the towns temperance league into a raging fury, and since they could not push the car down the switchback, owing to the brake being set by the moonshiners, a moral battle would ensue. Prayer, speeches, banners, and song on the part of the temperancers, against a good natured revelry of illicit commerce and no small measure of a different sort of song on the part of the moonshiners. In time, someone would be dispatched down the hillside to the Drywater yard to implore the tank engine crew to come push the revelers back up the hill."
      The wagon contained a still, a few raggedy tents, and assorted barrels and jugs, not to mention a handful of besotted occupants. Lots of opportunity to add interesting  detail!

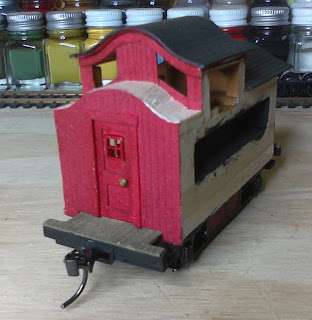
     I got the other end on my caboose. From the short end, the pug face is even more apparent. I painted the inside black so that I need not add interior details. The cupola inside is wood brown, since the eight windows will let some light in. The sides will have two windows each, with a blank space between, plus two smaller cupola windows.
     The doorknob on this end I painted with a dab of zinc chromate, which gives it a brass appearance. Once the roof is on, I plan to make railings and grab irons of brass wire, and figure out how to make lights, chimney, and a whistle. I want to have a conductor and maybe a brakeman riding on the platform. It seems the T&D was a great railroad for hangers on, owing to the steep grades up and down the mountain, and unauthorized riders were treated with indulgence.

Welcome to the T. & D. R. R.!

Cosmo Van Pelt in front of the
 Drywater candy shop, 1915

A Little Known Chapter of California Desert History

     Although barely a trace of the original road remains in place today, and contemporary source documents are rare as hen's teeth, I feel uniquely qualified to model this fascinating enterprise. My great great uncle Cosmo Van Pelt worked "The Delirium Route," as it was colloquially known, from 1897 to 1933 and kept a wonderfully observant and introspective journal throughout his career. From the pages of his journal, I will try my best to faithfully recreate the history, setting, and operations of this quirky little railroad.

     Rather than set out to create an orderly and scholarly history, I plan to keep things more or less anecdotal. Uncle Cosmo's journal is a hodge-podge of opinions, reflections, sketches, and conversations; historical details are many, and interspersed throughout. His random approach sets a relaxed standard that I hope to recreate here. I will relate his experiences when appropriate, chronicle my modeling efforts as they progress, and above all, enjoy the process. Uncle Cosmo was an aficionado of fast cars (for their time,) slow trains, snowshoe racing, and exploration in the Alaska territory. And as you can see, he was always a sharp dresser. My mother tells me we met once, when I was a newborn and Cosmo was long since retired, and that we got along famously. I like to think that I inherited from him not only his journal, but my tendency to overdress for the occasion. As Cosmo says, "the paw-paw never flings far from the patch."

     My latest modeling project is the bobber caboose for my rendition of the Topdown & Drywater. Uncle Cosmo's sketch doesn't show the entire caboose, but rather shows a detail of the unique sad-eyed expression of the cupola windows, which derives from the reverse-curved roof.

     The siding is cardstock, or more properly 140lb hot press, 100% rag watercolor paper. I scribe with the back side of a hobby knife and paint exclusively with solvent based paints, which soak in wonderfully without any tendency to warp the paper. The little window trim is scale 2x2 lumber and the doorknob is the head of a pin.